Overview
The Risk Cloud API uses OAuth 2.0 for authentication, which uses a bearer token in the Authorization HTTP header. Please take note that these tokens have an expiration time of one year. After the token expires, you will need to generate a new one.
For users who need multiple access keys, you can create a separate, named Access Key for each use case from your Profile page, instead of sharing a single Bearer token across all of them.
In this article:
- Retrieving Your Access Key Through Risk Cloud
- Creating Multiple Access Keys Through Risk Cloud
- Creating an Access Key from Your Client ID and Secret
- Managing Access Keys via the API
- Token Lifecycle
- Best Practices
- Next Steps
Retrieving Your Access Key Through Risk Cloud
Go to your Profile page. Click the Person icon in the top right corner, then Profile, then open the Access Key tab. If this tab is not there, contact your Risk Cloud administrator, you may not have API privileges.

This tab is where you manage the credentials behind your Bearer tokens. Your Client ID is shown directly at the top; your Secret is never displayed here, only Reset Secret Key is available if you need one. Below that, the Access Keys table lists every token tied to your account. On a brand new account this table starts empty.
To obtain a ready-to-use Bearer token, either:
- Create a named Access Key right here in Risk Cloud. See Creating Multiple Access Keys Through Risk Cloud below. (Recommended)
- Use your Client ID and Secret to request one from the API. See Creating an Access Key from Your Client ID and Secret below.
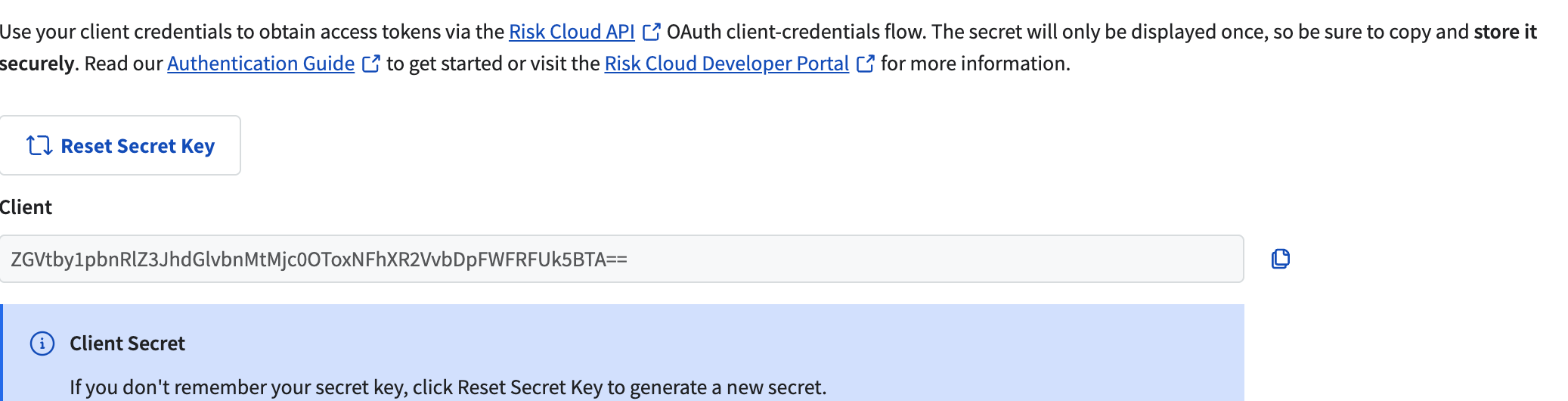
If you’ve ever generated a token through the legacy single-token flow described below, it also shows up in the Access Keys table, labeled Default:
Creating Multiple Access Keys Through Risk Cloud
To create a named Access Key, go to your Profile page. Click the Person icon in the top right corner, then Profile, then open the Access Key tab. If this tab is not there, contact your Risk Cloud administrator, you may not have API privileges.
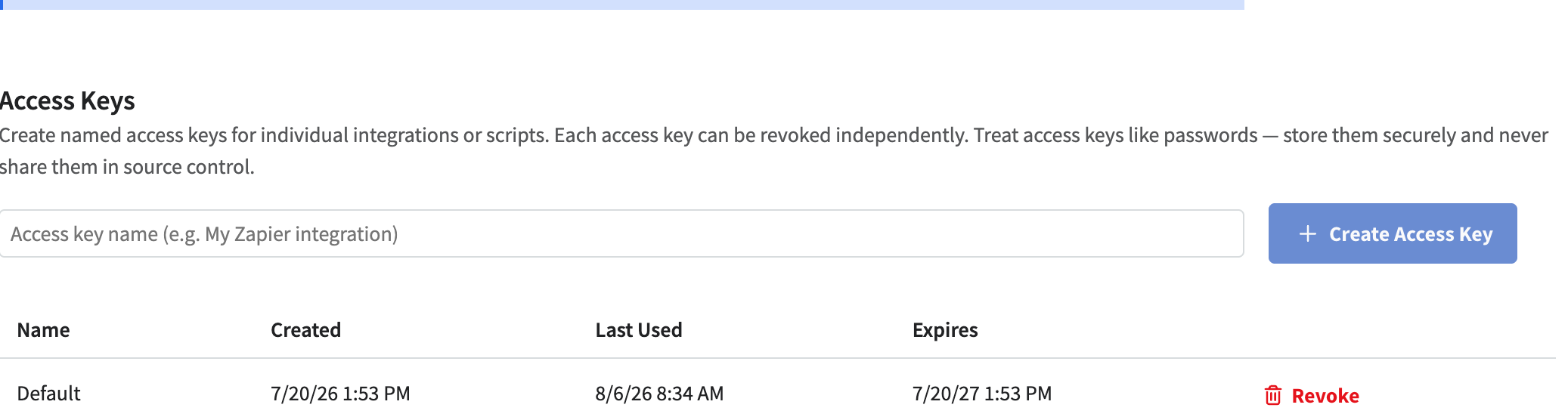
Below the Client ID field, the Access Key tab includes an Access Keys section, where you can create any number of independent, named tokens. Each key can be revoked on its own without disturbing the others.
This is useful if you have several tools or scripts calling the API. Give each one its own named Access Key so you’re not sharing a single Bearer token and re-issuing it to everyone every time one use case needs rotating.
To create a new Access Key:
- In the Access Keys section, enter a name for the key. Up to 100 characters, something that identifies the use case.
- Click Create Access Key.
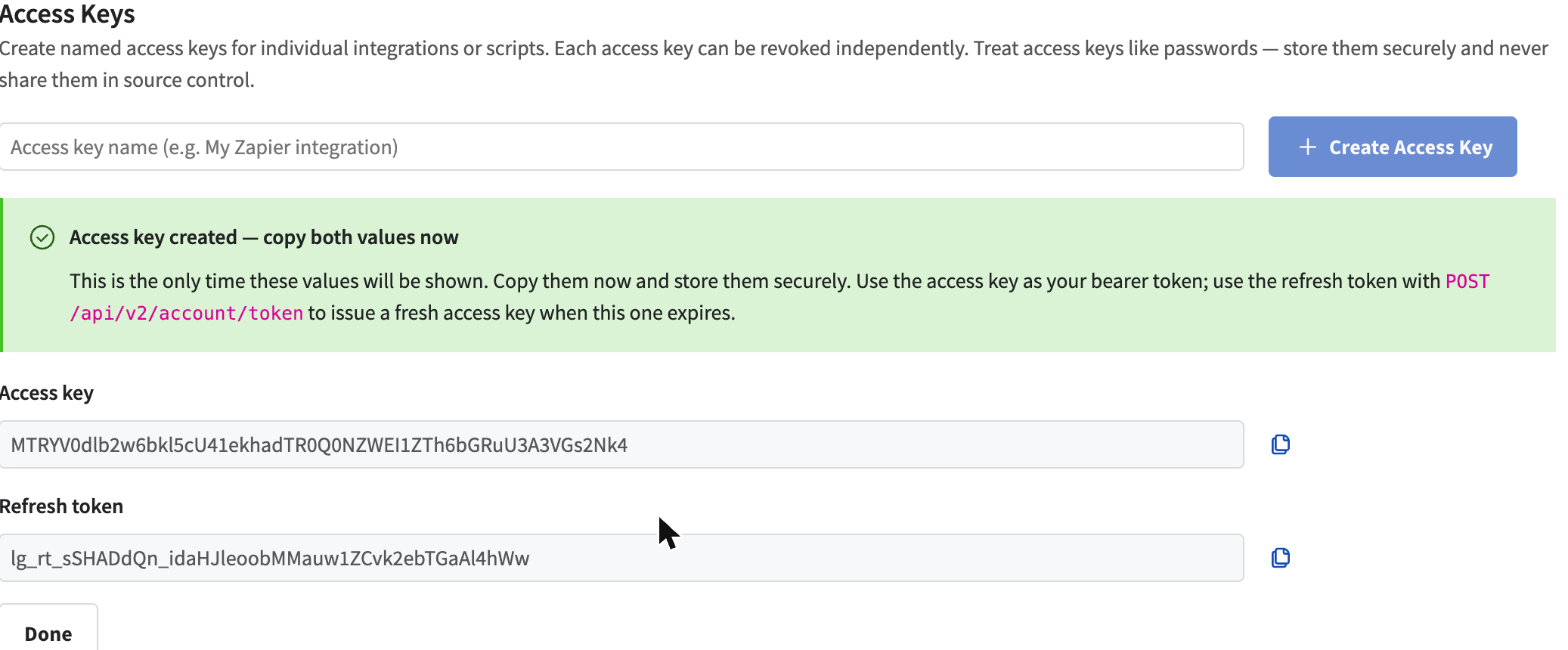
- Your new access key and refresh token are displayed once. Copy both immediately and store them in your secrets manager. They cannot be viewed again after you navigate away. Use the access key as your Bearer token; use the refresh token with
POST /api/v2/account/tokento issue a fresh access key once this one expires.
Every Access Key you’ve created is listed in a table below, showing its name, creation date, last-used date, and expiration date, along with a Revoke action.

There is currently no fixed limit on the number of Access Keys you can create.
Creating an Access Key from Your Client ID and Secret
First, go to your Profile page. Click the Person icon in the top right corner, then Profile, then open the Access Key tab. If this tab is not there, contact your Risk Cloud administrator, you may not have API privileges.
Your Client ID is shown directly in the Access Key tab. Your Secret is never displayed there, click Reset Secret Key to generate one. If this is your FIRST TIME using the API, reset your secret now to get your first Secret.
Resetting warns you before it proceeds, since it revokes every existing Access Key and the legacy default token along with the old Secret:
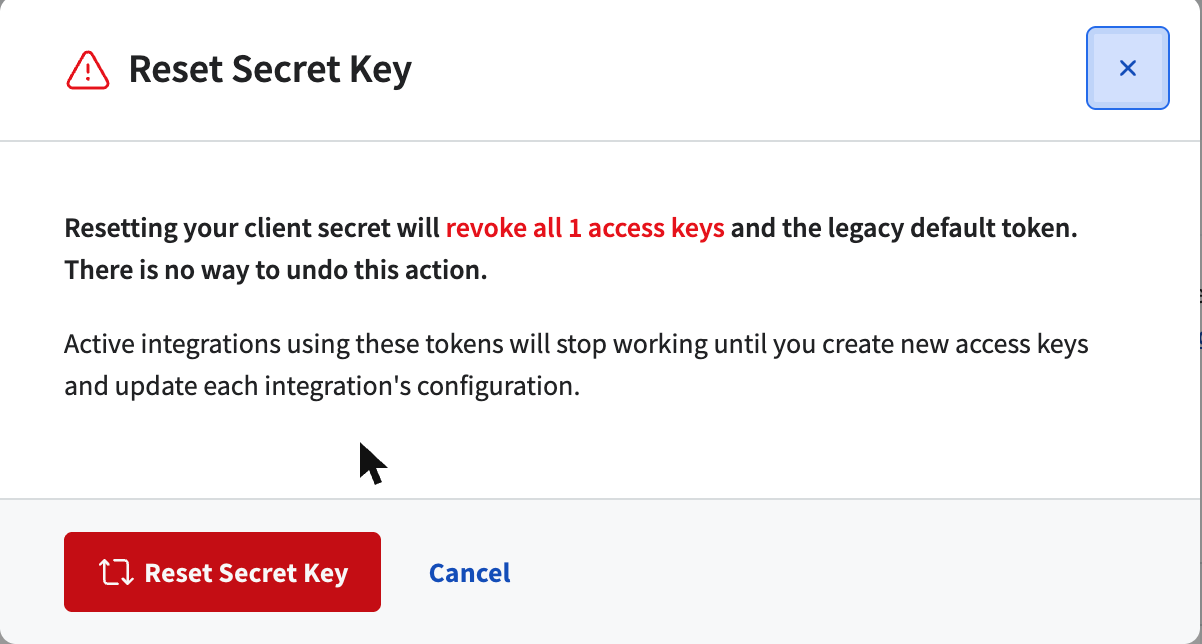
Once you confirm, your new Secret is shown once, copy it immediately; the Client ID stays the same.
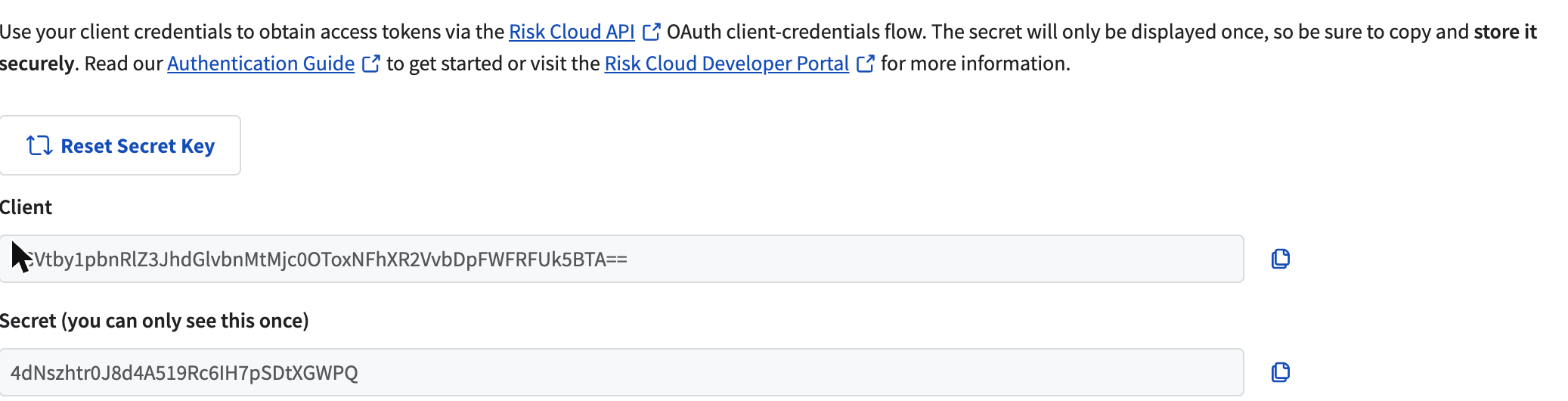
Once you have both your Client ID and Secret, they will need to be base64 encoded before they can be used in an Authorization header.
- Encode via Terminal:
echo -n '{CLIENT}:{SECRET}' | base64 - Encode via PowerShell:
[Convert]::ToBase64String([System.Text.Encoding]::UTF8.GetBytes('{CLIENT}:{SECRET}'))
Once they are encoded, take your encoded string and place it in the authorization header as a “Basic Token” ex Authorization: Basic {ENCODED_BASE64_STRING}
Once this URL is pinged with the correct Authorization Header a JSON response will appear mimicking the following structure:
Endpoint: POST /api/v1/account/token
Response:
{
    "access_token": "KEY_HERE",
    "token_type": "bearer",
    "expires_in": 31532918,
    "scope": "read write"
}
The returned access_token can then be used in the authorization header as a “Bearer Token” to interact with Risk Cloud’s API
Authorization: Bearer {ACCESS_TOKEN}Note: This endpoint always manages a single default token tied directly to your Client ID and Secret, shown as Default in the Access Keys table. If you’re calling the API for more than one use case, consider creating an Access Key for each one instead. See Managing Access Keys via the API below.
Managing Access Keys via the API
Named Access Keys can also be created and managed directly through the API, without using the Profile page. These calls require a valid Bearer token in the Authorization header, so you’ll need at least one Access Key already, either your default token or a named one, before you can create or manage others this way:
Authorization: Bearer {ACCESS_TOKEN}See Retrieving Your Access Key Through Risk Cloud or Creating an Access Key from Your Client ID and Secret if you don’t have one yet.
| Action | Endpoint |
|---|---|
| List your Access Keys | GET /api/v1/account/tokens |
| Create a new Access Key | POST /api/v1/account/tokens |
| Revoke an Access Key | DELETE /api/v1/account/tokens/{id} |
| Refresh an Access Key’s token | POST /api/v2/account/token |
Creating an Access Key takes a JSON body with a name field and returns the access token and refresh token once, along with the key’s metadata:
{
    "id": "KEY_ID",
    "name": "Reporting Integration",
    "access_token": "KEY_HERE",
    "refresh_token": "REFRESH_KEY_HERE",
    "created": "2026-03-14T00:00:00Z",
    "expires": "2027-03-14T00:00:00Z"
}
Instead of re-generating a token from scratch, an Access Key’s token pair can be refreshed directly. This rotates that key’s access and refresh tokens without touching any of your other Access Keys:
Authorization: Basic {ENCODED_BASE64_STRING}{
"refresh_token": "REFRESH_KEY_HERE"
}Token Lifecycle
Tokens live for one year, but a few other events can end a token’s life before then:
- Regenerating your default token invalidates only that default token. Every call to
POST /api/v1/account/tokenfor a given user deletes that user’s existing default token, then issues a fresh one. This applies regardless of which client or machine made the request, two processes sharing the same Client ID and Secret share the same default token, and either one can invalidate the other. Named Access Keys are unaffected. Calling this endpoint doesn’t touch any Access Key you’ve created separately. - Revoking a named Access Key affects only that key. Creating, refreshing, or revoking one Access Key never invalidates your other Access Keys or your default Bearer token.
- Resetting your Client Secret invalidates everything. Using Reset Secret Key on the Profile page rotates the Secret that all of your tokens are cryptographically tied to. This deletes your default token and every named Access Key at once. The Profile page will warn you how many Access Keys are about to be revoked before you confirm.
- Disabling the owning user invalidates their tokens. All tokens for disabled users, both default and named, are deleted immediately.
- Expired tokens are auto-removed. A token presented after its
expires_in(or the corresponding Access Key’s expiration) has elapsed returns401 Unauthorizedand is removed server-side on first use.
Revoking a Token Manually
To invalidate your default token without issuing a replacement:
Endpoint: DELETE /api/v1/account/token
You can also click Revoke next to the Default entry in the Access Keys table on the Profile page.
To revoke a specific named Access Key instead, use DELETE /api/v1/account/tokens/{id} or the Revoke button next to that key in the same table.
Best Practices
Give each use case its own Access Key
Create a separately named Access Key for each script or use case instead of distributing one shared Bearer token. If a single use case is compromised, decommissioned, or needs rotating, revoke just that key. Every other use case keeps running.
Cache tokens for the full year
Generate a token, store it (with its expiry timestamp) in your secrets manager or a process-local cache, and re-use it for every API call. Do not call POST /api/v1/account/token (or create a new Access Key) at the start of every request, beyond the latency cost, regenerating your default token rotates it and invalidates anything else that was using it.
Handle 401 with one retry, then fail loud
When a request returns 401 Unauthorized:
- If you’re using a named Access Key, refresh it via
POST /api/v2/account/tokenwith its refresh token. Otherwise, generate a fresh default token. - Replay the request once with the new token.
- If it still fails, surface the error, don’t loop.
A persistent 401 after a successful refresh or re-generate usually means there is another service regenerating and invalidating the token using the same credentials.
Rotate the Client Secret on a schedule
The Client Secret does not rotate automatically, it lives until you replace it, and it underpins your default token and every named Access Key at once. Treat it like any production credential:
- Rotate on a defined schedule (quarterly is common).
- Rotate immediately on personnel changes or any suspected exposure.
- When you rotate, update the secret in your secrets manager first, then trigger a re-generate of your default token and re-issue any Access Keys that depended on it.
- If only one use case is compromised, revoke that use case’s named Access Key instead of resetting the shared Secret. It’s faster and won’t take down anything else.
Store credentials in a secrets manager
Never commit the Client ID, Client Secret, or any Access Key’s access/refresh tokens to source control, and don’t bake them into container images. Use a real secret store and pull them at runtime.
Next Steps
Once your Bearer token is created, you’re ready to start interacting with our API. For more details, check out our API Documentation.
For instructions on interacting with our API via Postman, check out our Postman Help Article.